Amazon EC2
Step-by-Step AWS EC2 Set-up Tutorial
This article is a super simple walk-through of the process of setting up an AWS EC2 instance. We will go through
- Instance initialization.
- Installing necessary software and machine learning packages.
- Transferring of files from your local files to your remote instance
A quick explanation of AWS EC2 will help us know what we’re working with. Amazon Elastic Compute Cloud (EC2) is part of Amazon’s cloud-computing platform, Amazon Web Services (AWS). AWS allows people to rent virtual computers to run their own programs and applications. An AWS “instance” is a virtual machine, booted up by the user, and configured with any desired software. A user can create, launch, and terminate their server instances as desired, paying the by second for active serves, as well as designation geographic locations of their code deployment and data storage, hence the term “elastic.”

1. Set up EC2 Instance
First, open the Amazon EC2 console at https://console.aws.amazon.com/ec2/ and click on “Running Instances”. You should see the below page come up. Click on Launch Instance.

Choose which type of Virtual Machine you would like to use. The Amazon Machine Images are pre-configured virtual machines that serve as a template for your instance.
If you’re a Mac user, it’s a good idea to select one of the Linux AMI’s, 64-bit.
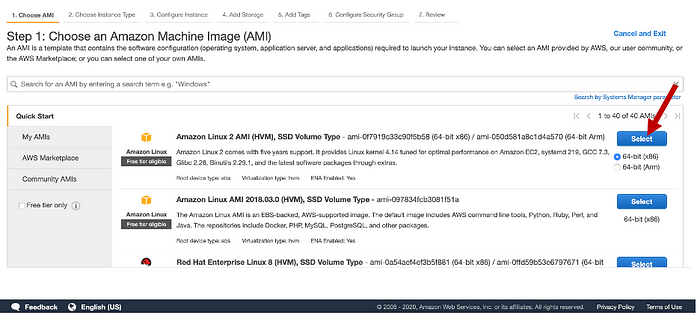
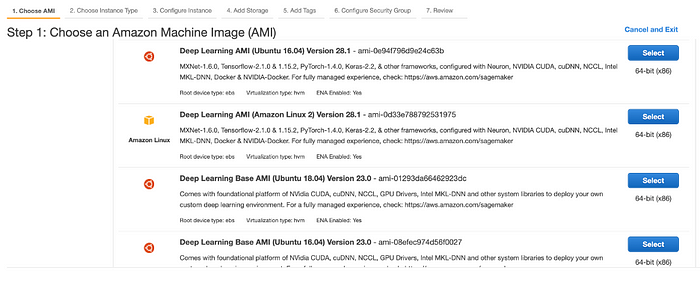
If you know that you’ll be running deep learning models on your virtual machine, there are AMIs geared for that purpose. Of course, the basic Amazon Linux AMI can be set up to run those same models.
You can also change your geographic location to change the location for your instance to be deployed. Prices tend to vary slightly between geographic locations, and I use us-east-1.
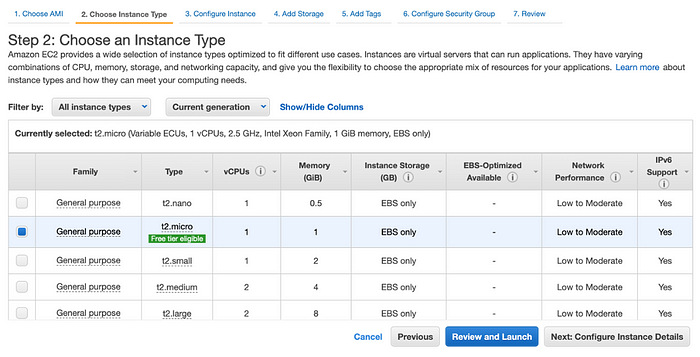
Next, choose an instance type to set the storage and size of your instance. T2.micro is set as the type by default and eligible for Amazon’s free tier. I find that I always run out of memory on the t2.micro instance, so take how much memory you’ll need into consideration.
Next, click on Review and Launch to let the AWS wizard set up the default configurations for you.
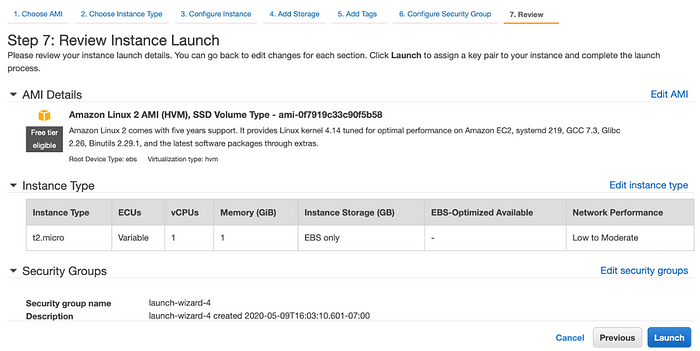
Next, review your instance and modify security groups if necessary. Click Launch!
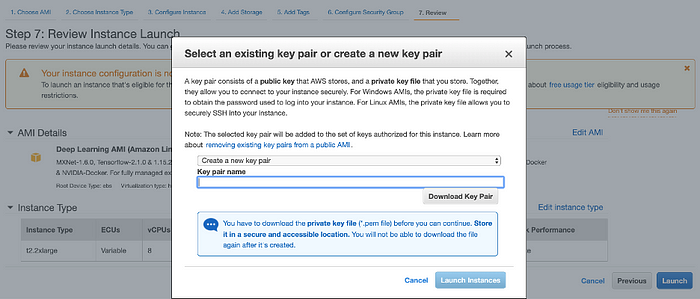
You will have to specify a key pair. If you already have an AWS key-pair, you can select to use that one. If not, you will select Create a New Key Pair. Enter any name for the key pair. Then, click Download Key Pair. This will be the only time you will be able to download this key pair. Move it to some secure location, or somewhere you will not delete it. You need this key-pair to allow you to enter your instance. Consider it a password. Now, launch your instance!
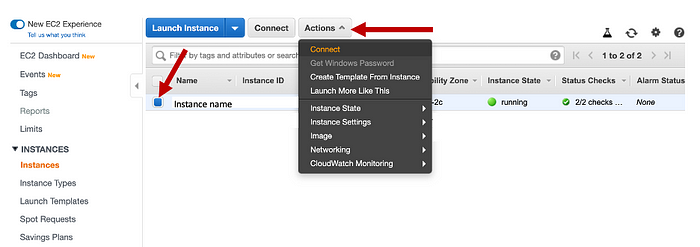
Now that your instance is launched, next we have to connect to the instance via SSH. On the EC2 instances dashboard, click the button next to your instance name, and click on Actions. A dropdown menu should appear under Actions, and click on Connect.
You will see this window for connecting to your instance.
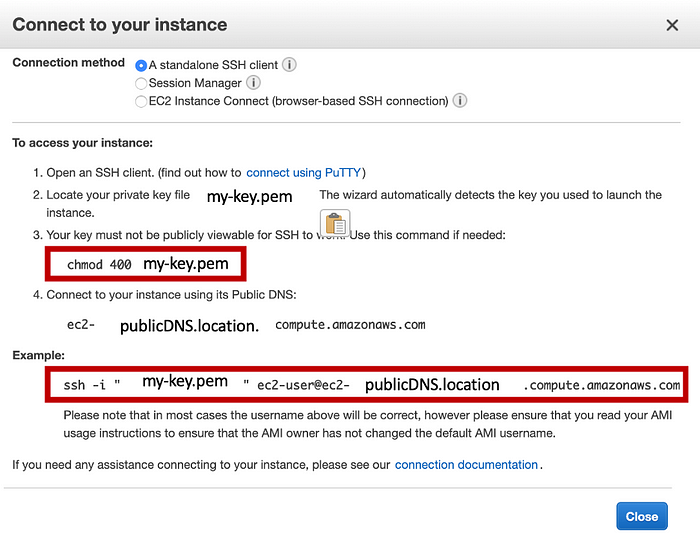
Open Terminal and go to the folder at which your key-pair is stored. Run the chmod command to change permissions on your key-pair. Then, run the ssh command to enter your instance. You will need to rerun the chmod command to modify the permissions on your key-pair every time you restart your computer in order to enter your instance.
2. Software Installation
Now, for the easy part! The next step is to install needed software and machine learning packages, such as Python3, Conda, Pytorch, etc. From here, I assume we begin from the basic Amazon Linux AMI, since the deep learning AMI’s tend to already have these packages installed.
Yum is the default installer on the Amazon Linux AMI.
$ sudo yum update
$ sudo yum install emacs
To install pip, use:
$ curl https://bootstrap.pypa.io/get-pip.py -o get-pip.py
$ python3 get-pip.py
Install Anaconda.
$ cd /tmpcurl -O https://repo.anaconda.com/archive/Anaconda3-5.3.1-Linux-x86_64.sh $ sha256sum Anaconda3-5.3.1-Linux-x86_64.sh $ d4c4256a8f46173b675dd6a62d12f566ed3487f932ba
b6bb7058f06c124bcc27 Anaconda3-5.3.1-Linux-x86_64.sh $ bash Anaconda3-5.3.1-Linux-x86_64.sh $ source ~/.bashrc (or open up a new terminal)
Let’s get Numpy and Scipy.
conda update -n base -c defaults condaconda install numpy scipy
And Pytorch.
conda install pytorch torchvision -c pytorchAnd lastly, Git!
sudo yum install git-allNow, we’re ready to run code.
3. Transfer Files
To transfer files between our local directories and the remote instance, you can run
$ scp -i /path/my-key.pem /path/to/file ec2-user@publicDNS.compute-1.amazonaws.com:~/path/to/locationHowever, for transferring many files in specific local locations, I prefer to use FileZilla. Download FileZilla from https://filezilla-project.org/.
Under File, click on Site Manager.
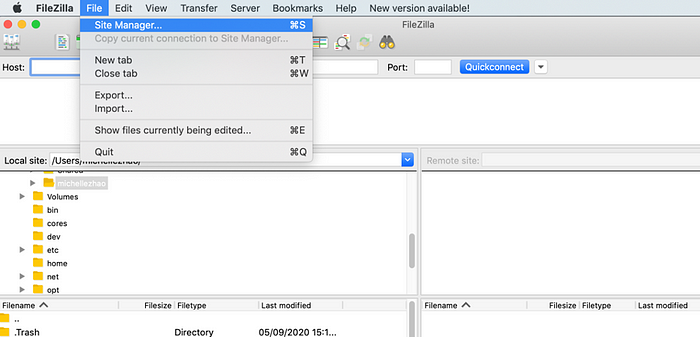
In the Site Manger window, click on new Site. Set protocol to SFTP. Set the host to your public DNS. This public DNS can be by going to your EC2 Instances Management Console, clicking on your instance, and copying the entry under Public DNS (IPv4) in the Description box. Set the port to 22. The user will be ec2-user. Lastly, navigate to your saved key-pair file on your local computer. Click connect.
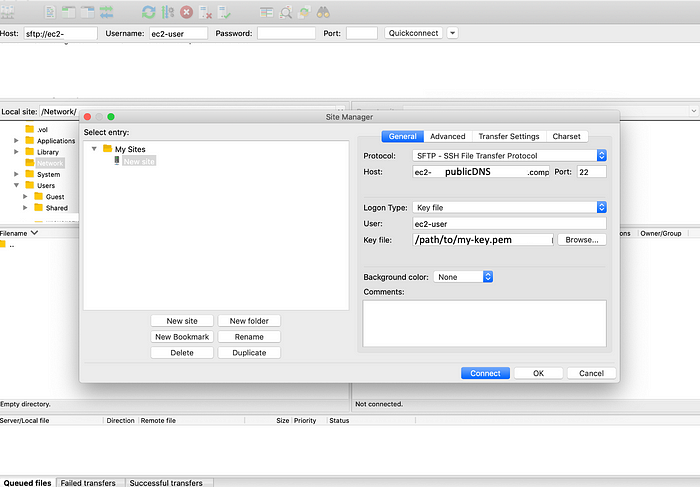
Now, you can drag files from your local files to the remote EC2 instance.
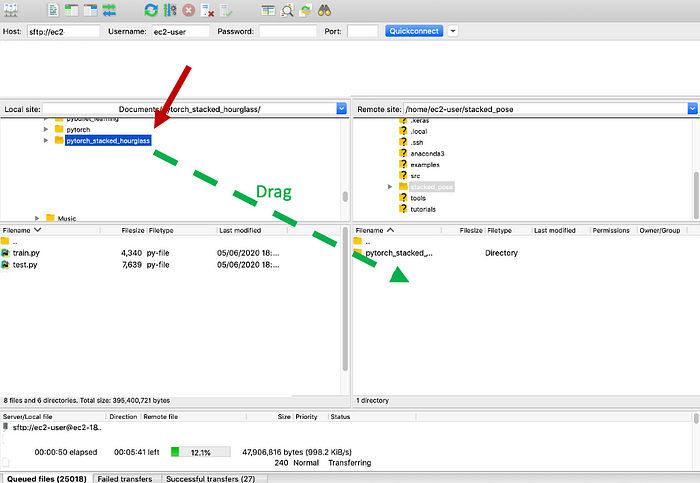
Output files can be similarly transferred back to your local machine through FileZilla or scp.
Now, you can SSH into your instance and run all of your code virtually!
Comments
Post a Comment